Field Extensions
Overview
Field extensions in Enterprise Forms allow you to enhance the functionality of form fields by adding custom properties. These properties can be configured in the CMS editor and accessed in the delivery tier to control how fields are rendered.
A demonstration of field extensions is available in the eforms demo. You can download the demo from here.
Note: You need an Enterprise Maven repository account and must be logged in to access the demo.
When to Use
Use field extensions when you need to add custom configuration options to Enterprise Forms fields that are not available by default. Field extensions are suitable when you want to:
- Add new properties to fields in the CMS editor
- Control field rendering in the delivery tier based on custom properties
Example
Creating a Field Extension
This example demonstrates how to create a field extension that adds an extra text property called first. You can use other property types, such as boolean, as needed.
- Create the Java class
FieldExtensionExampleincms/src/main/java/com/example/fieldextensions/FieldExtensionExample.java:
import org.apache.wicket.markup.html.basic.Label; import org.apache.wicket.markup.html.form.TextField; import org.hippoecm.frontend.plugin.IPluginContext; import org.hippoecm.frontend.plugin.config.IPluginConfig; import com.onehippo.cms7.eforms.cms.fieldextensions.AbstractFieldExtensionPlugin; import com.onehippo.cms7.eforms.cms.fieldextensions.model.FieldExtensionModel; import com.onehippo.cms7.eforms.cms.model.SingleValuePropertyModel; public class FieldExtensionExample extends AbstractFieldExtensionPlugin { public FieldExtensionExample(final String id, final FieldExtensionModel extensionModel, final IPluginConfig config, final IPluginContext context) { super(id, extensionModel, config, context); final Label label = new Label("label", "First example"); final TextField<String> textField = new TextField<>("first", new SingleValuePropertyModel<String>(extensionModel.getNodeModel(), "first")); textField.setEnabled(true); add(textField); add(label); setOutputMarkupId(true); } }
- Add the corresponding Wicket markup file at
cms/src/main/java/com/example/fieldextensions/FieldExtensionExample.html:
<!DOCTYPE html PUBLIC "-//W3C//DTD XHTML 1.0 Strict//EN" "http://www.w3.org/TR/xhtml1/DTD/xhtml1-strict.dtd"> <html xmlns="http://www.w3.org/1999/xhtml" xmlns:wicket="http://wicket.apache.org/dtds.data/wicket-xhtml1.4-strict.dtd" xml:lang="en" lang="en"> <wicket:panel> <div class="property"> <div class="label-wrapper"> <span class="label" wicket:id="label">[Label]</span> </div> <div class="field-wrapper"> <input type="text" class="textfield" wicket:id="first"/> </div> </div> </wicket:panel> </html>
- Update your CMS
pom.xmlto include HTML files in the build. Add the following configuration in the build section:
<resources> <resource> <filtering>false</filtering> <directory>${basedir}/src/main/java</directory> <includes> <include>**/*.html</include> </includes> </resource> </resources>
- Rebuild and restart your project to apply the changes.
Configuring the Field Extension
- Open the Console.
- Navigate to the following path:
/hippo:namespaces/eforms/form/editor:templates/_default_/fieldextensions/cluster.options
- Add the fully qualified class name of your field extension to the
field.extensionsproperty:
com.example.fieldextensions.FieldExtensionExample
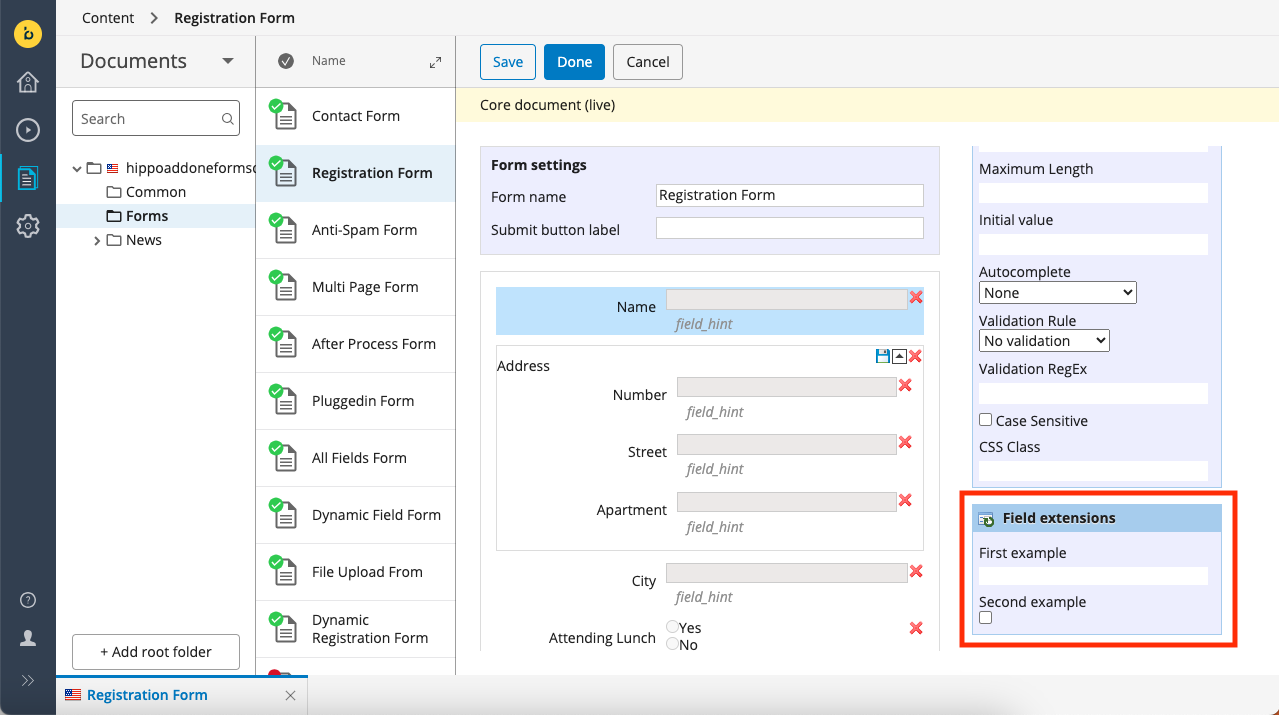
After configuration, the field extension appears in a separate section called "Field extensions" on the right side of the content editor, below the "Edit Field Properties" section.
Using the Field Extension in the Delivery Tier
In your Freemarker template, you can access custom properties defined by your field extension to adjust field rendering. For example, you can append a CSS class or hide a field based on the property value.
Access the custom property using getCustomProperty and the property name:
<#if field.getCustomProperty("first") == "foo">bar</#if>
Verification
- Confirm that the field extension appears in the CMS editor under "Field extensions."
- Set a value for the custom property and verify that it is accessible in the delivery tier template.
- Adjust rendering logic in your template based on the custom property value.