Create a Custom Image Set
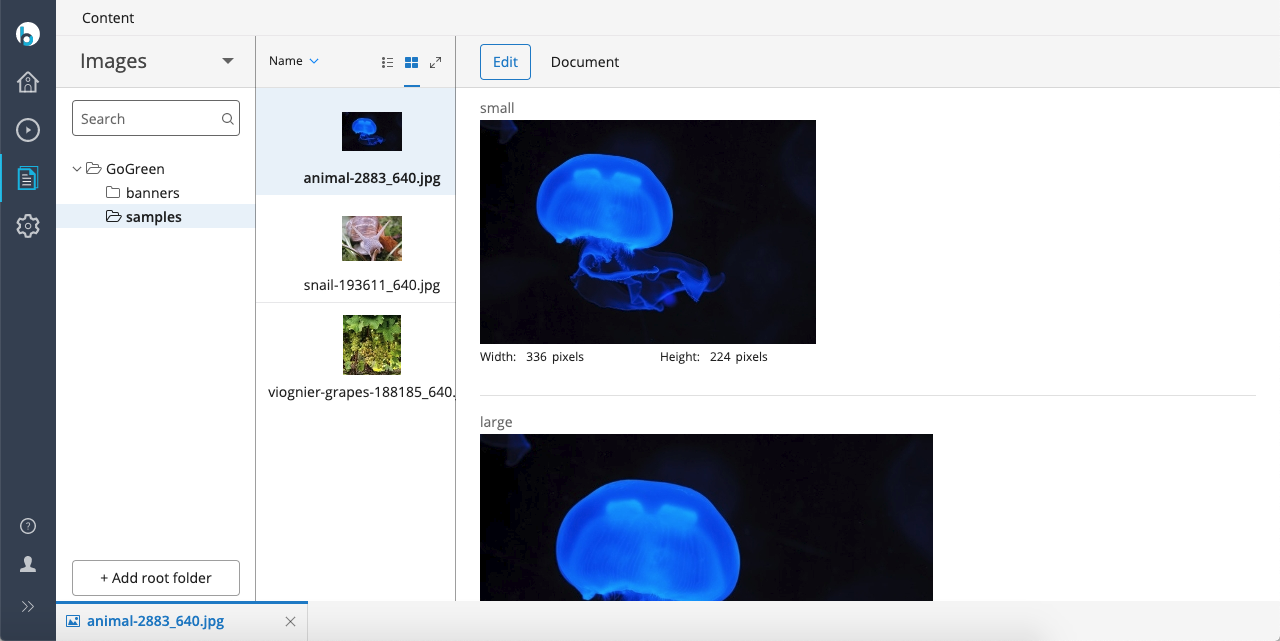
Bloomreach Content generates multiple variants for each uploaded image. These variants are grouped as an image set and are visible in the image gallery within the CMS. By default, an image set includes the original image and a small thumbnail, which the CMS uses in listings and pickers.
The default image set type is hippogallery:imageset. This type stores the original and thumbnail variants, along with their width and height. It also records the original file name.
You can extend the default image set to include additional scaled variants. You can also create multiple custom image set types, each with different variants. This approach is useful when only specific channels require certain image variants, reducing unnecessary processing for unused variants.
Hint: You can configure custom image sets using the Gallery Manager tool in the setup application.
Do Not Change Thumbnail Dimensions
The CMS uses the standard 'thumbnail' variant. Modifying its dimensions can cause issues in the CMS interface. If you need a different thumbnail size for your site, create a separate custom variant.
The following example demonstrates how to create a custom image set with an additional 'preview' variant, scaled to a maximum of 640x480 pixels.
1. Subtype the Base Type
Add a custom image set type to your project's .cnd file. Example:
<'hippogallery'='http://www.onehippo.org/jcr/hippogallery/nt/2.0'>

[myproject:myimageset] > hippogallery:imageset, hippogallery:relaxed
To register the updated CND in your local development repository, choose one of the following:
- Rebuild and restart your project with a clean repository.
- Use 'CND Import' in the console to import your
.cndfile.
After importing, use 'CND export' to verify that the repository recognizes the myproject:myimageset type.
2. Create a Document Type for the New Image Set
A custom image set requires a corresponding document type. The document type editor does not support inheritance from types in other namespaces, so you must create the document type manually in the console. The following steps show how to create an image set called myimageset with an additional preview variant.
-
In the console, copy the node
/hippo:namespaces/hippogallery/imagesetto
/hippo:namespaces/myproject/myimageset -
Update the supertype of the copied image set. In the node
/hippo:namespaces/myproject/myimageset/hipposysedit:nodetype/hipposysedit:nodetypeset the multi-value property
hipposysedit:supertypetohippogallery:imagesetandhippogallery:relaxed. Sethipposysedit:urito your project's namespace URI (as defined in the.cndfile). -
Add a nodetype definition for the
previewvariant. In the same node as above, copy theoriginalnode topreviewand set itshipposysedit:pathproperty tomyproject:preview. -
Add a template definition for the
previewvariant. In/hippo:namespaces/myproject/myimageset/editor:templates/_default_copy the
originalnode topreview, set itsfieldproperty topreview, and update thecaptionproperty toPreview. -
Change the primary type of the prototype node for the new image set. Select
/hippo:namespaces/myproject/myimageset/hipposysedit:prototypes/hipposysedit:prototypeand set its primary type to
myproject:myimageset. -
Add the new variant to the prototype. In the same prototype node, copy
hippogallery:originaltomyproject:preview. -
Provide translations for the new image set. Copy or recreate the node structure from
/hippo:configuration/hippo:translations/hippo:types/hippogallery:imagesetto
/hippo:configuration/hippo:translations/hippo:types/myproject:myimagesetRe-create all properties in the
myprojectnamespace. These labels appear in the gallery picker and image editor. You can provide translations for the image set name using thejcr:nameproperty. -
Save your changes.
3. Configure the Queries Used to Create a New Image in the Gallery
In the console, navigate to
/hippo:configuration/hippo:queries/hippo:templates/new-image-folder/hippostd:templates/image gallery
Set the hippostd:gallerytype property to myproject:myimageset. Update this property in all relevant folder nodes under /content/gallery to ensure the new image set is used in existing gallery folders.
To apply this change during repository bootstrapping, add the following YAML to your project's repository-data-application module:
definitions: config: /hippo:configuration/hippo:queries/hippo:templates/new-image-folder/hippostd:templates/image gallery: hippostd:gallerytype: operation: override type: string value: ['myproject:myimageset']
4. Configure the Gallery Processor
The gallery processor generates all image variants in an image set. When you add a new variant, configure the gallery processor to scale the original image to the required size.
Info: Supported image types include JPEG, GIF, PNG, BMP, and SVG (using pixel units).
Gallery processor configuration is located at
/hippo:configuration/hippo:frontend/cms/cms-services/galleryProcessorService
Each image variant is defined as a child node named after the property in the CND (for example, myproject:preview). The default configuration includes hippogallery:original and hippogallery:thumbnail. Each variant node supports the following properties:
-
width and height
Specify the bounding box size in pixels. The processor scales the original image to fit this box, preserving aspect ratio. A width or height of 0 or less means "unbounded" for that dimension. If both are 0 or less, the image is copied without scaling. The default is 0 for both.
Info: Cropping does not support width and height set to zero, as this breaks the UI for image variant display.
-
upscaling
Determines whether images smaller than the bounding box are upscaled. Accepts
trueorfalse. Default isfalse. -
cropping
Determines whether images are cropped to fill the bounding box. Accepts
trueorfalse. Default isfalse. -
optimize
Sets the scaling optimization strategy. Possible values:
- speed
- speed.and.quality
- quality
- best.quality
- auto
The default is
quality. These map to theSPEED,BALANCED,QUALITY,ULTRA_QUALITY, andAUTOMATICmethods in Scalr.Method. -
compression (lossy formats)
Sets compression quality for lossy formats (e.g., JPEG). Specify a value between 0 and 1. Lower values increase compression and reduce quality. The default is 1 (no compression).
-
compressionLossless (lossless formats)
Sets compression quality for lossless formats (e.g., PNG, GIF). Specify a value between 0 and 1. Lower values increase compression and may affect processing time. The default is 0 (maximum compression).
Info: Changes to the gallery processor configuration take effect after you refresh the CMS page or log out and back in.
Example
The following diagram shows how width and height settings affect image scaling with two bounding boxes (red and blue) and two original images. Bloomreach Content does not add whitespace to thumbnails, so generated thumbnails may have varying sizes:
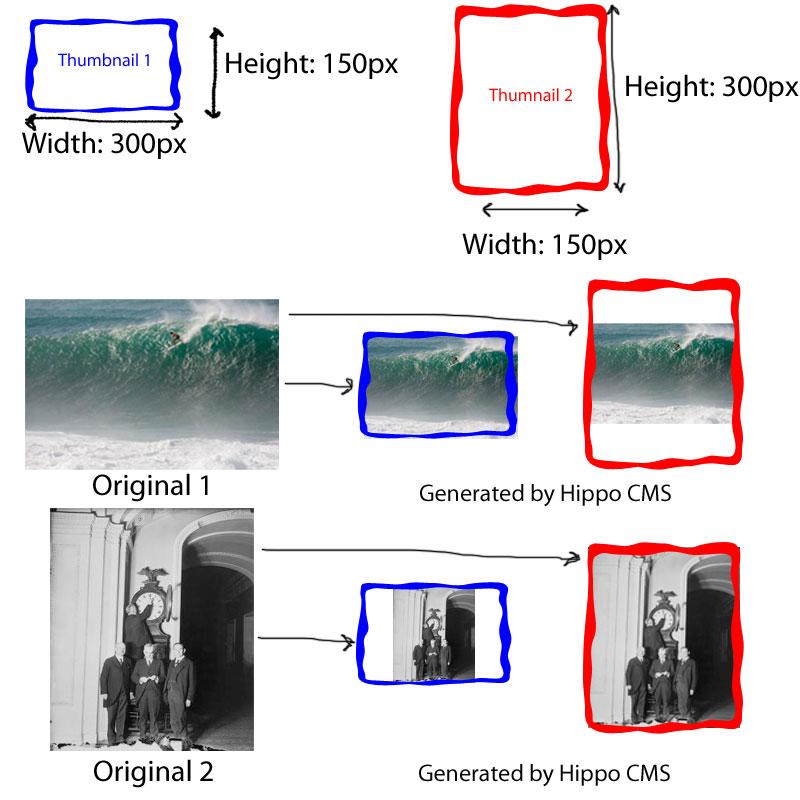
Diagram: The diagram shows two thumbnail bounding boxes: a blue horizontal box (Thumbnail 1, 300x150px) and a red vertical box (Thumbnail 2, 150x300px). Below are two original images: a landscape wave photo and a portrait photo. Arrows indicate how each original image is scaled and cropped to fit both bounding boxes. The CMS scales and crops images to fit the specified dimensions, resulting in different visible areas and aspect ratios, without adding empty space.
To configure the 'preview' variant, copy the hippogallery:thumbnail node to myproject:preview and set:
- width = 640
- height = 480
5. Use the Custom Image Set in Your HST Site
To use the custom image set in your HST site, create a Java bean for it. For example:
@Node(jcrType = "myproject:myimageset") public class MyImageSet extends HippoGalleryImageSet { public HippoResourceBean getPreview() { return getBean("myproject:preview"); } }
Ensure the HST can locate your new image set bean. Add the bean to the same package as your document beans, or include the package in your HST bean scanning configuration.
You can then expose the custom image set from a document bean. For example, if a document has a 'logo' field:
public MyImageSet getLogo() { return getLinkedBean("myproject:logo", MyImageSetBean.class); }
6. Tweak the URLs of Image Variants
By default, the URL for the 'preview' variant of a 'logo.jpg' image is similar to /binaries/content/gallery/mysite/logo.jpg/logo.jpg/myimageset:preview. You can configure the HST to generate alternative URLs, such as /binaries/preview/content/gallery/mysite/logo.jpg, by setting up custom resource containers.
Related Notes
Consider the following when working with images:
Cropping Images in the Image Set Editor
The built-in image cropper allows you to select and crop a region for each variant. The cropper uses a fixed aspect ratio based on the variant's dimensions. If upscaling is disabled, the cropper prevents selections smaller than the variant size, which avoids upscaling the cropped area. This extends the default cropper behavior, which is based on the YUI Image Cropper. For more details, see the YUI Image Cropper documentation.