Deploy a Project Distribution
Overview
This page describes how to deploy a project distribution to a Tomcat installation in a target environment.
When to Use
Deploy a project distribution after packaging your Bloomreach Experience Manager (XM) project for deployment to test, acceptance, or production environments. For details on creating a distribution, see Create a Project Distribution.
Deployment Diagram
A project distribution provides a directory structure designed for deployment in a standard Tomcat installation. The following diagram illustrates the deployment structure:
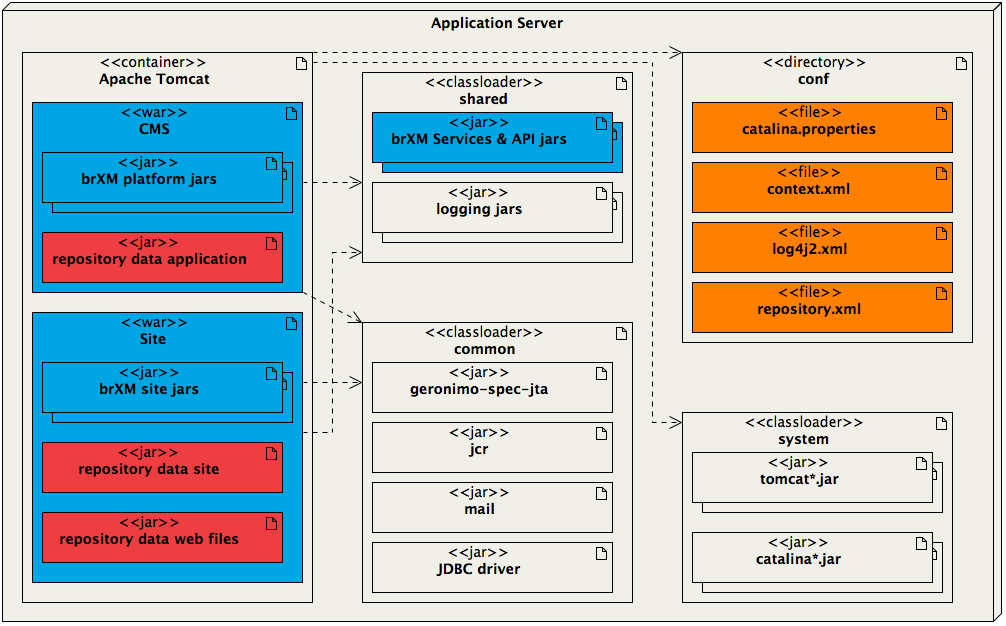
Diagram: The diagram shows an application server running Apache Tomcat. It includes Tomcat classloaders and a configuration directory. Inside Tomcat, there are two WAR files (CMS and Site), each containing brXM JARs (blue) and project-specific repository data JARs (red). The shared classloader contains brXM Services & API JARs and logging libraries. The common classloader holds libraries such as geronimo-spec-jta, jcr, mail, and a JDBC driver. The system classloader contains tomcat*.jar and catalina*.jar. The conf directory includes catalina.properties, context.xml, log4j2.xml, and repository.xml. Dashed arrows indicate loading relationships between web applications, classloaders, and configuration files.
Note: For a detailed explanation of the distribution file structure, see Create a Project Distribution.
Following recommended best practices, only the out-of-the-box brXM components (blue) and project-specific elements (red) from the distribution are deployed. Generic (grey) and environment-specific (orange) components are configured at the container level. The steps below follow this best practice.
Prerequisites
Before deploying, ensure the environment is prepared according to the documentation:
- Application Server
These instructions assume Apache Tomcat on Linux. - Database
- Web Server / Reverse Proxy
Deployment Steps
Complete the following steps to deploy the project distribution:
-
Upload the project distribution archive to the target server.
-
Switch to the user account that runs the application (for example,
cms):su - cms -
If Tomcat is running, stop the service:
/etc/init.d/cms stop -
If a previous project distribution was deployed, remove all contents from the Tomcat
webappsandshareddirectories:rm -rf ~/tomcat/webapps/* ~/tomcat/shared/* -
Extract the distribution archive into the Tomcat root directory. Only extract the
sharedandwebappsdirectories:cd ~/tomcat tar -xzf /path/to/download/location/myproject-<VERSION>-distribution.tar.gz webapps sharedOnly the
sharedandwebappsdirectories should be extracted. Other configuration is managed at the container level and should not be overwritten. -
Start Tomcat:
/etc/init.d/cms startNote: The first startup may take longer as the database and content repository are initialized.
Note: On the first deployment, the content repository is bootstrapped using the project's bootstrap data. Ensure the distribution includes bootstrap content for the initial deployment.
On subsequent deployments, in environments configured according to the Linux installation manual, repository bootstrap is disabled by default. If a CMS upgrade or new project release requires new content to be bootstrapped, temporarily enable it by updating the
bin/setenv.shscript in the Catalina Base directory: change-Drepo.bootstrap=falseto-Drepo.bootstrap=truein theREP_OPTSvariable.After deployment, revert the change in
bin/setenv.shto disable repository bootstrap.
Next Steps
After the initial deployment, configure the application for the environment as described in Required Configuration After First Deployment.